Gimp brush tutorial
This tutorial was made using Gimp 2.2. (How to download and install the Gimp for Windows, look HERE.)
Content of this tutorial:
1. Using brushes
2. Downloading brushes
3. Creating brushes
Using brushes
There are 3 basic types of brushes in Gimp: ordinary brushes, colored brushes and animated brushes.
None of these are scalable - the size they were created in is the size you can use them in.
Brushes can be used with a wide range of tools: pencil, paint brush, air brush, eraser, rubber stamp, smudge, blur/sharpen and dodge/burn.
The pencil tool will make a crisp look without any transparency; the other tools makes a smoother look if the brush is anti-aliased or has semi-transparent areas.
Ordinary brushes can be used with any color - or even a gradient. Colored brushed will only use the color of the brush. Animated brushes can be used with a color if they are grayscale, otherwise they will behave as colored brushes.
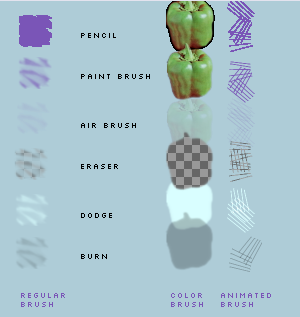
Here I've tested the 3 brush types with differerent tools. (Note: the eraser tool will erase to background color if the image has no alpha channel. To create an alpha channel choose Layer -> Transparency -> Add Alpha Channel. )
(The brushes I've used for this example are Sand Dunes, Pepper and Pencil Sketch#1.) Notice the lack of transparency with the pencil. The paint brush gives a smoother look, while keeping the solid parts of the brush opaque. The airbrush makes the entire brush semi-transparent.
Choosing a brush to use
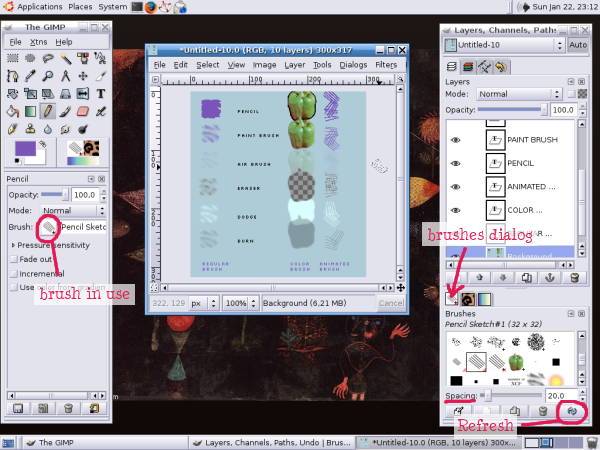
You can see the brush currently in use in the Tool Options dialog. Change the brush by clicking the brush preview here - or from the Brushes dialog. The Brushes dialog is easier to browse and you can also change the spacing of (ie = distance between) the brush strokes. If you've added new brushes use the 'refresh' button to import the brushes without restarting Gimp.
If the brush folder is set to 'writable' you can also delete unwanted brushes from here. I'll show you where to do that later on in the tutorial.
From File -> Preferences -> Tool Options: 'Paint options shared between tools' you can decide if you set the brush for each tool individually or all tools will use the latest used brush (tick off all boxes for this option). I prefer no sharing, but that's a matter of taste. When making changes in the preferences you might need to restart the program - Gimp will let you know if this is the case.
Symbols in the brush dialog
Some brushes appears with a tiny + or a red triangle in the corner in the brush dialog. The + means the brush has been shrunken to create the preview - click and hold on the + to see the actual brush size.
The red triangle means an animated brush. Click and hold to view the frames of the animation.
>>> next page, Downloading brushes >>>

