Gimp doll tutorial
This tutorial was made using Gimp 2.2 for Windows. (How to download and install
the Gimp, look HERE.) I'm sorry for the ugly
look of some of the screenshots, but I was being very brutal with the color
reduction to save disk space and bandwith.
If you are new to dolling please read page 1 of my
basic doll tutorial first for introduction to doll nettiquette.
1. Preparing the base
2. Drawing the pants
3. Shading the pants
4. Tool experiments
5. Drawing and shading the shirt
6. Drawing and shading the hair
7. Final touches
8. Saving as gif with transparent background
Preparing the base
Open up a doll base. I'm using a base of my own that you can find in the base
section. Go to File -> Open... then browse for the file (click 'browse
for other folders') Now I have my image opened and my desktop looks like this:
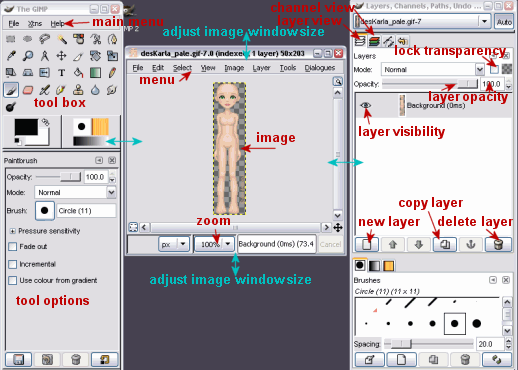
Notice that the title bar says "(indexed, 1 layer)" after the
title. This means the colors have been converted to 256 indexed colors to
fit the gif format. We'll need to change this in order to work on the doll.
Choose Image -> Mode -> RGB from the menu. Notice that the title now
says RGB instead of Indexed. That means we're ready to go.
Next thing I'll make the canvas bigger, as I need more space to draw on hair
and clothing. Choose Image -> Canvas Size from the menu.
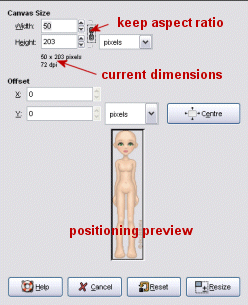
The current dimensions are 50x203 pixels. I'll set the new width to 90 pixels
and the new height to 260 pixels. You'll need to press the chain icon or else
it will keep the aspect ratio (meaning if you change the width the height
will change automatically to fit).
Now you'll be able to see the new dimensions
of the canvas in the little preview window. You can drag the base around to
position it or simply press the 'center' button to center it in the middle
of the new canvas. Now press the 'resize' button and the canvas is ready.
At this point I'll save my image as a xcf file, which is the native gimp
file format. This format supports layers and you should always save in xcf
to make your own life easier. You'll only need to save as a gif when the doll
is finished (we'll get to that part later).
For now, choose File -> Save
As... and click 'browse for other folders'. Find a place and a name for your
file and remember to set the file type to Gimp XCF image. ( Press the 'Select
File Type' to browse for file extensions... if you can't scroll the list you
might need to hit the maximize button on the top right of the window). Hit
the save button when you're done.
Remember to save your doll often as you work.
I've had problems with the palette not converting from indexed to RGB properly
so I always close and open the file again, then the palette is reset and ready
to go. (this also works if the program starts acting weird for no reason)
>>> next page, Drawing the pants >>>