Drawing the pants
OK, on to the actual dolling...I'll start with drawing the pants, but first
I'll create a new layer for storing my color palettes.
Make a new layer by
pressing the 'new layer' button or selecting layer -> new layer from the
menu. Name the new layer Palette as this is where we'll put the palettes for
the different parts of the doll. Keep the layer fill type as 'transparency'.
Make sure the Palette layer is the active layer (click on it in layer view
to make it active). Then click on the foreground color in the toolbox to select
a new color...
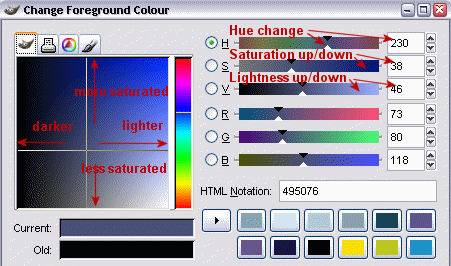
I'll go with a blue one for her pants.
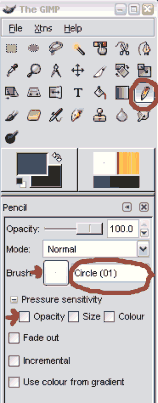
Now grab the pencil from the toolbox. The pencil settings will appear below
the toolbox. The opacity should be 100, mode normal. Click on the brush
button to select a new brush... we'll go with a 1x1 pixel brush, the one
that's called 'Circle (01)'. And make sure all pressure sensitivity settings
are turned off (not sure if you actually see those if you don't have a tablet)
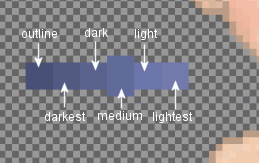
Now the pencil is ready we'll draw the palette for the pants. Zoom in and
draw a box 4x4 pixels in size, click on the foregound color and select a
lighter color (move pointer to the right of the old color) and draw a box
with that color. Continue untill you've got a palette with 6 colors; outline,
darkest, dark, medium, light, lightest. I make the medium box bigger so
it's easier to spot.
Make sure to check the palette in 100% view as well... it should look smooth
but the colors should not blend. If you're doing a shiny fabric you want
more contrast, if you're doing a dull fabric you want the colors closer
together.
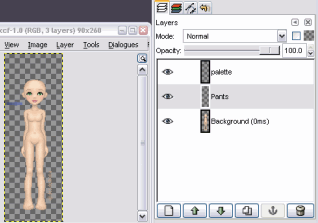
Ok, now create a new layer and name it Pants (keep the layer fill type
transparent). The new layer will be created on top on the active layer,
you can click-drag or hit the lower layer/raise layer arrow buttons to move
it. I'll move the Pants layer down cuz I like to keep the palette on top.
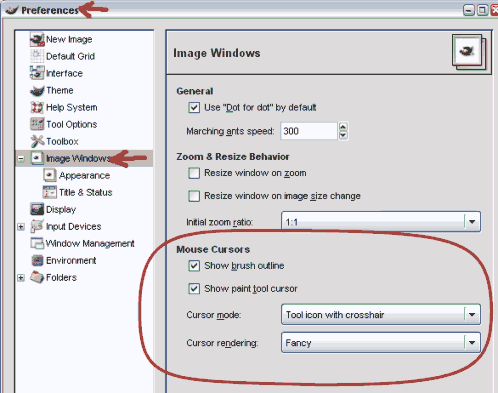
(Cursor settings can be found in File -> Preferences in the main menu...
play around with them to find out what suits you best. These are mine:
 )
)
Still using the pencil
tool you'll be able to pick the colors from the palette by holding down the
SHIFT key and click on a color. You'll need to have used the tool before the
color picker will show though, if it doesn't work then just click and draw,
press CTRL+z to undo and then your color picker will show automatically when
you hold down CTRL the next time.
You'll need to set up the actual color picker tool to 'sample merged', or
you'll only be able to pick colors from the active layer though:

Start by picking the outline color (to the far left) and draw the outline
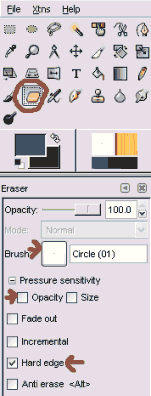
of the pants. Switch to the eraser tool with SHIFT+e and back to the pencil
tool with n. Use the eraser tool with these settings:
At this point I find it hard to work on the transparent background so I create
a new layer called Bkgr, move it to the bottom and use the paintbucket with
these settings to fill it with a light color that I won't be using anywhere
else on the doll.
Much easier to see... now I clean up my outline using the eraser tool so
that it's only 1 pixel wide in all places.
My doll now looks like this:
Now I duplicate the Pants layer by clicking the duplicate layer button
(or right-click on layer in layer view, choose Duplicate Layer). I double-click
the name of the Pants Copy layer and rename it Pants Outline. Then I click
the eye symbol to hide it.
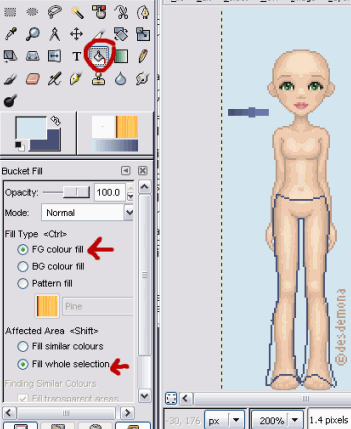
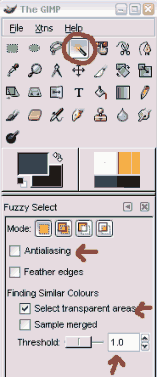
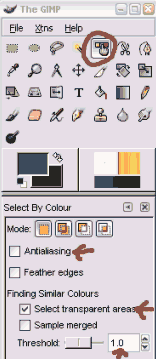
I then go to the pants layer. I want to make a selection to fill the pants
will color. You can use either the magic wand tool or select by color tool
for this, or a combination of both... these are the settings you want:
In any case,
it's important to make sure there are no gaps in your outline before using
the tools.
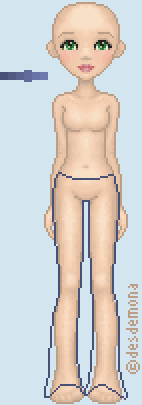
In this case the fast thing to do is press CTRL+a (select all) and then use
the magic wand with CTRL pressed down (holding CTRL will subtract from a selection,
while shift will add to it). Still holding down CTRL click on the empty areas
around the pants and between her legs to get rid of those from the selection.
Now your selection should looks like this:
Get the color picker tool and pick the medium color from the palette. You
can close the dialogue box that pops up. Now grab the bucket/fill tool and
fill the selection with color. Remove selection when you're done with CTRL+SHIFT+a
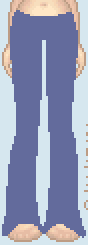
or Select -> None from the menu. That should leave you with this:
>>> next page, Shading the pants >>>