Masks in Paint Shop Pro
This tut was made for PSP 7.04
Masks can be a very useful way to blend layers and work with transparency or semi transparency... very useful for making cool website layouts (like my own, hehe)
The purpose of this tut is to get you started on psp masks on your own.
content:
1. Creating a mask from an image
2. Inverting and editing a mask
3. Saving and loading a mask and editing the masked layer
4. Hiding and deleting a mask
5. Example: scanned drawing
6. Example: image blend
7. Example: another image blend
Creating a mask from an image
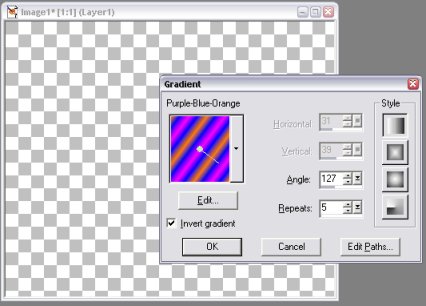
Ok I start of with making a layer with a colorful gradient for my background. Click and hold for a little while on the foreground color, then choose the gradient tool. Click once on the gradient that now appears as the foreground color. I choose a colorful premade gradient (click the down arrow next to the gradient), repeat it 5 times and set the angle to be sloped.
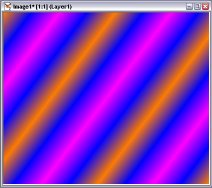
Then I use the flood fill tool to fill in the gradient.
I rename the layer 'gradient'. Then I make a new layer than I fill out with black and rename that 'black'
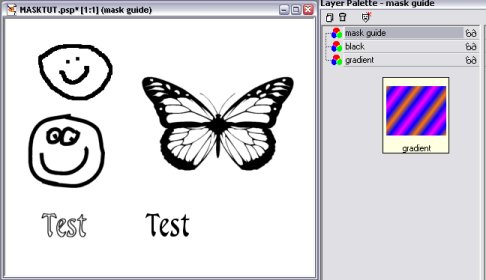
Now I create a 3rd layer that I call 'mask guide'. I fill out the layer with white using the bucket tool. Then I use the black color to draw stuff onto it. I try out both the paint brush, the draw tool with anti-alias turned on, the text tool and preset shapes tool. I only use the black color for this.
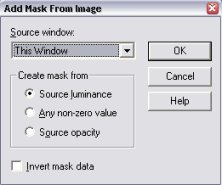
Now I'm gonna use this layer to create a mask on my black layer. First I make sure the 'mask guide' layer is on top and visible. Then I select the black layer from the layer palette, so that the black layer is the active one (even though it's still the mask guide layer that is showing). I choose Masks -> New -> From Image... The settings should be like this:
The mask will now be created on the active layer, and will be created from what is visible in the image. White will be translated into opaque and black will be translated into transparent, greytoned will be semi.transparent, the darker the more transparent.
I make the mask guide layer invisible (I might as well delete it because it is not needed now that the mask has been created on the black layer).
Now my image looks like this:
>>> next page, Inverting and editing a mask>>>