Paint Shop Pro tips and tricks for dollers
These are a few useful things I've come to learn about Paint Shop Pro in the years I've used it, methods that I use frequently when dolling. I use psp 7.04 and I'm not sure if you can use all these tips for all versions, but try your way ;)
content:
1. layers
2. duplicate layers
3. lock layer transparency
4. save a selection
5. shortcut color picker
6. color change
Layers
If you're not a complete newbie you already know and love layers.
But if you are a newbie, here are some tips:
Layers will allow you to keep different parts of your drawing apart, even if you draw one thing on top of another. Say you draw a doll base and then some pants on top. If you wanted to delete the pants you would also delete the base. But if you kept the base on one layer and the pants on another, then you could delete the pants without ruining the base.
Layers are also useful for adding effects like blur or texture or even color change to some parts of your drawing only. So if you draw hair for a doll on a seperate layer you can easily change the color from red to blue without the base ending up color changed too.
You can change the transparency for individual layers, very useful for pantyhose and other see-through clothing.
When I doll I usually do a layer for the background color, one for the base, one for each clothing item, one for the hair and one or more for details.
It's a good idea to name the layers after the content, it's much less confusing. And make sure you're working in the right layer, confusing the layers is such an easy mistake.
Layer palette guide and example:

NOTE: if you save your doll as a .bmp or .gif the layers will be merged into one image. Not very handy if you want to go back and make changes. So ALWAYS save you image as a .psp file before saving as a .gif, that way you can always go back to the layered version.
Also, you will only be able to add new layers if you're working in 24 bit color (colors -> increase color depth -> 16 mio colors)
Can't find the layer palette? Try View -> Toolbars and make sure the Layer Palette is selected.
Duplicate layers
As I work on a doll I usually do backup of layers. When I've finished say the pants outline and fill I usually make a copy before I start to shade. Then I can go back to the backup layer if I screw up ;) Or if I think the hair I made looks ok but could use a little extra I do a backup copy before I start to mess with it any more.
In the layer palette, right-click on the layer you want to copy and choose Duplicate layer. That's it. It's a good idea to make the backup layer invisible so it doesn't get in your way (click on the glasses next to the layer name) - and make sure you're working in the right layer before continuing.
Lock layer transparency
This one was such a revelation to me when I discovered it *lol*
On the layer palette, see the little lock with the red cross? When the lock is crossed you can add and delete new stuff to the layer, but if you click on the lock then the transparency of that layer is locked. I.e. you can not add or remove any new pixels - what is solid stays solid, what is transparent stays transparent. You can however still change the color of the solid pixels, it is only the transparency that is locked.
So if you want to use the smudge tool or soften tool without blurring you edges too the transparency lock is very helpful. Or if you are shading with the paint tool - with the transparency locked you don't need to worry about keeping inside the outline.
If you need to add or remove pixels you simply unlock the layer again from the layer palette.
NOTE: the transparency lock do not affect vector tools, i.e. the text, draw and preset shapes tools
Save a selection
This method I use a lot for my outlines. When I doll I start doing the outline, then fill with a solid color. Shading at this point messes up the outline, unless I am really careful. So what I do is get the magic wand selection tool (tolerance set to 0), click on the outline and choose Selections -> Modify -> select similar. Now my entire outline will be selected. Then I go to Selections -> Save To Disk -> and save my selction. (I usually just save it as 'temp' and overwrite it the next time I'm saving a selection.)
Now I shade the doll (first I lock the transparency of the layer) and when the shading is done I go to Selection -> Load From Disk -> and browse for my saved selection. Now I fill the selection with a color a bit darker than the darkest color on that layer. And my outline is back :)
Short cut color picker
If you were only to learn one psp shortcut this would be it... when you doll (especially when you're pixel shading) you change the color you use a lot. Usually you have to get the color picker from the tools menu and then switch back to the paint brush. BUT - pressing CTRL while you're using the paintbrush will make the color picker appear. Click (while holding down ctrl) to pick a foreground color, right click to pick pick a background color. When you release the CTRL key, the color picker will go away. Very handy. It works on other tools too, such as flood fill and color replacer.
If you do a small palette of the colors you're gonna use you will save a lot of mouse work with this short cut.
Color change
Some times you just don't get it right in the first try. Or maybe you just want to do another version of a doll you like. I use 3 different methods for color changing:
* color replacer
* adjust hue/sat/light
* colorize
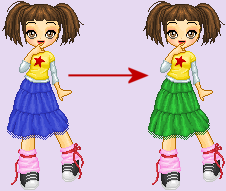
*color replacer*
This method is good, because you have exact control of which colors will be used. And you can choose to change only some colors. But it is only useful for changing stuff with few colors - so pixelshaded stuff only, it's no good for anything that has been toolshaded in any way. (If you're not sure how many colors are on your layer try this: Colors -> Count Colors Used. 6-7 colors are easy to do, you might even wanna do 10, but definitly not 1867!)
This is what I do: Say I want to change the color of a skirt. I make a small palette using the color picker with all the colors I've used, from the darkest to the lightest. Then I do another palette beneath it, this is the new colors I want to use instead also from the darkest to the lightest.
Now I get the color replacer tool from the tool menu and set it to a fairly big size, 10-15 pixels for example. If I want to make my skirt lighter I start with the light end of the palette, if I want to make it darker I start with the darker end. Now I right-click on the first old palette color and then left click on the first of the new ones. (The new color should be foreground the old color background). Then I go over the entire skirt with the brush. I pick the next set of colors (old and new) and go over the skirt again. I repeat this with all colors of the palettes.
Example: These palettes(the old palette is on top) and the color replacer will do this:
(base by angy-chan)
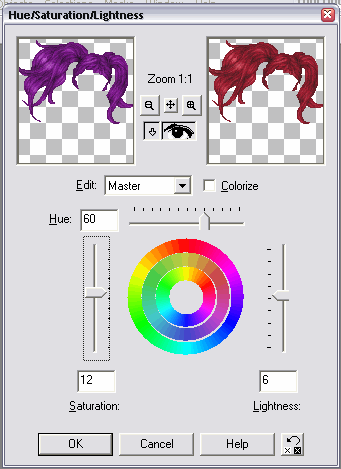
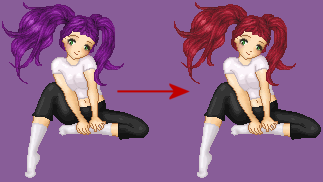
*adjust hue/sat/ligh*
This method is really good for tool shaded stuff.
Colors -> Adjust -> Hue/Saturation/lightness. And then simply pull the sliders till you get a good result. Some colors need more saturation that others to look good, so be sure to play around with the saturation slider. Generally red needs to be very satuated to look bright and not brownish, while green colors will be almost neon like with a saturation set too high.
example:
These settings:
will do this:
(base by ritratto di signora)
Depending on the colors, you might need to do the Colors -> Adjust -> Brightness/contrast also.
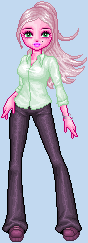
*colorize*
I don't like this method a lot, but it can be used for some things where the other methods won't give you the result you need. It will turn all colors into the tone you selected.
Choose Colors -> Colorize and play around with the settings.
Example (I've colorized the whole doll to give you a better idea of how it works):
will do this:
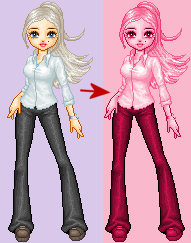 (base by pinkland)
The whole doll is in pink and red tones where as the hue/sat/light method would do this to her:
(base by pinkland)
/end of tips and tricks/
made by desdemona. email me with any comments or suggestions